10 Essential Tips for Vacuum Forming Plastic Sheets Successfully?
In the world of manufacturing, mastering vacuum forming plastic sheets is essential. As industry expert John Smith states, “Understanding the nuances of this process can elevate your products significantly.” Vacuum forming involves heating plastic sheets until they are pliable, then using a vacuum to shape them around a mold.
However, achieving success in this method is not always straightforward. Many face challenges in temperature control and material selection. The quality of your vacuum formed parts depends on these factors. If the sheets are overheated, they can bubble or tear. Conversely, underheating can lead to incomplete molding.
Having the right tools and knowledge makes a difference. Observing common mistakes allows for better outcomes. Taking the time to refine techniques can lead to improved results. Each attempt teaches valuable lessons. Embracing these challenges is key to mastering vacuum forming plastic sheets.
Understanding the Basics of Vacuum Forming Plastic Sheets
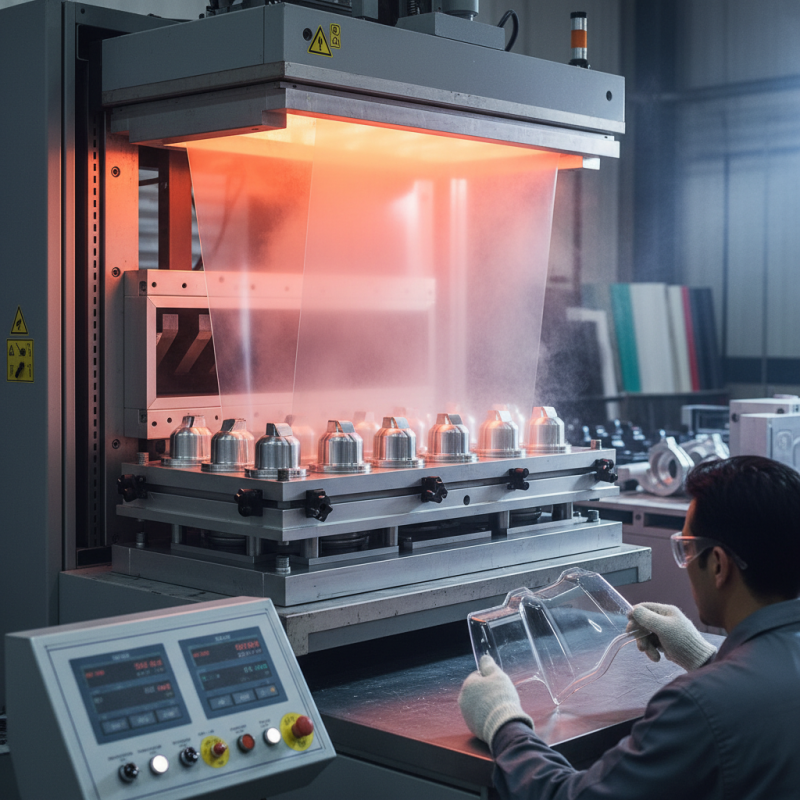
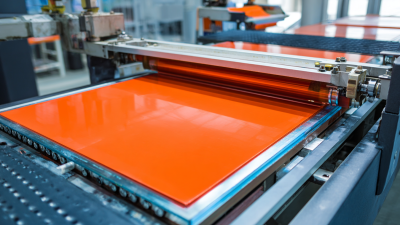
Vacuum forming is a method used to shape plastic sheets. Knowing the basics is crucial for success. The process involves heating the plastic until soft and pliable. A mold is then used to give it shape. This may sound easy, but attention to detail is key. Heating the plastic evenly can be a challenge. If not done properly, it may bubble or warp.
Choosing the right plastic sheets matters too. Each type has unique properties. Some sheets may shrink or break when heated. Testing different materials can be helpful. Use samples to find the best fit for your project. Understand the mold design, as it impacts the final product. A complex design may not form well. Simplicity often leads to better outcomes.
Air pressure plays a vital role in vacuum forming. It must be strong enough to pull the plastic onto the mold. If the pressure is too low, the sheet may not adhere correctly. Watch for imperfections like uneven thickness. This may cause issues later in production. Learning from these mistakes is essential for improvement. Each attempt provides valuable insights that can guide future efforts.
Selecting the Right Type of Plastic for Your Project
When selecting the right plastic for vacuum forming, consider the project's requirements. The choice of plastic affects the final product's strength, flexibility, and appearance. For instance, ABS is popular for prototypes. It offers durability and ease of machining. PETG is another option. It is clear and has excellent impact resistance. However, it can be challenging to mold into intricate shapes.
Think about the specific demands of your project. Will the product be used outdoors? If so, UV resistance is key. PVC can be a good choice for such applications. It can withstand weathering, but be aware of its limitations in heat. In terms of thickness, many beginners underestimate this. A sheet that is too thick can cause issues during forming. On the other hand, something too thin may not hold shape well.
User experience varies widely with different plastics. Some users report difficulties achieving a smooth finish. Others struggle with warping during the cooling process. These are common challenges that don't have quick fixes. Learning from these experiences can lead to better choices in future projects. Always remember that experimenting with different materials can provide invaluable insights.
Preparing the Mold for Optimal Vacuum Forming Results
Preparing the mold properly is crucial for vacuum forming success. A well-prepared mold ensures that the plastic sheet forms correctly and captures fine details. Begin by selecting the right material for your mold. Metal or hard plastic is ideal due to its durability. Ensure the surface is smooth. Any imperfections can transfer onto your final product.
Before applying heat to the plastic sheet, check the mold for any debris or dust. Clean it thoroughly. Even tiny particles can create defects. After that, consider adding a release agent. This will help the formed plastic separate easily from the mold later.
Tip: Test with a small sample before moving to larger projects. This allows you to adjust mold details without waste. Also, remember to watch the temperature closely. Overheating can distort the plastic and compromise your design. Keep a close eye on details and do not rush the process. Sometimes, slow and steady wins the race.
10 Essential Tips for Vacuum Forming Plastic Sheets Successfully
| Tip Number |
Tip Description |
Importance Level |
| 1 |
Ensure the mold is clean and free of debris. |
High |
| 2 |
Use a smooth and well-machined surface for the mold. |
High |
| 3 |
Apply a release agent to facilitate demolding. |
Medium |
| 4 |
Ensure proper temperature settings for the plastic sheet. |
High |
| 5 |
Use the appropriate thickness of the plastic sheet. |
Medium |
| 6 |
Maintain vacuum pressure consistently throughout the process. |
High |
| 7 |
Design the mold for easy air flow to avoid bubbles. |
High |
| 8 |
Consider using test pieces before the final production run. |
Medium |
| 9 |
Check the mold's temperature before starting the vacuum forming. |
High |
| 10 |
Let the formed piece cool down properly before removal. |
High |
Setting Up Your Vacuum Forming Equipment Properly
Setting up your vacuum forming equipment properly is crucial for achieving great results. Begin by ensuring a clean workspace. Dust and debris can affect the quality of your formed pieces. All components should be free from dirt. Check your vacuum source for any leaks. A strong vacuum is necessary for proper forming.
When preparing your plastic sheets, consider their thickness. Thinner sheets may form more easily but can be less durable. Test different thicknesses for your specific project. Also, remember to preheat your plastic sheets. This ensures they become pliable and easier to shape. Heating them evenly can prevent warping during the process.
Keep an eye on your molds as well. Molds should be free from imperfections. Flaws on the mold can transfer to the final product. If you notice any issues, fix them before starting. Lastly, don’t rush the process. Take your time to adjust your settings and ensure everything is in order. Once you are confident, begin vacuum forming. Each attempt will offer lessons, improving your skills over time.
Vacuum Forming Techniques Effectiveness
Finishing Techniques to Enhance the Quality of Vacuum-formed Items
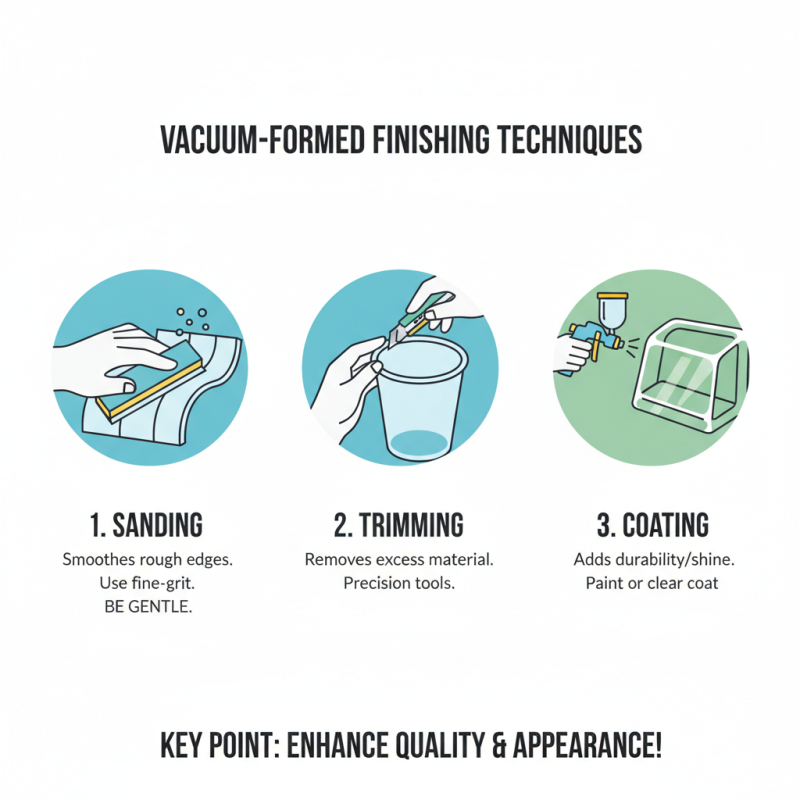
Finishing techniques play a crucial role in enhancing the quality of vacuum-formed items. One effective method is sanding the surface. It removes rough edges and provides a smoother finish. Use fine-grit sandpaper for the best results. A few minutes of sanding can make a significant difference. However, it’s easy to over-sand and damage delicate shapes. A delicate touch is essential.
Another technique is painting the finished product. A good paint job can elevate the appearance of vacuum-formed items. Choose paints that adhere well to plastic. Spraying can yield a uniform coat. But it requires practice and patience. Avoid drips by applying light layers. Sometimes, paint might not cover completely, leading to uneven coloring. Regular inspection during the process helps identify flaws early.
Additionally, using adhesive films can add texture and durability. These films are versatile and can enhance both aesthetics and functionality. Applying them correctly is vital. Misalignment can ruin the look. It’s important to apply films in a dust-free environment. This reduces imperfections. Awareness of these challenges can guide improvements in future projects, leading to more refined results.